

Rip your CD collection to your Innuos music library and enjoy your music without needing to handle physical discs. Sense extracts the audio and stores it on your system, automatically retrieving album information and artwork where available.
Before you start: What you need to know
- Compatible CDs: Standard audio CDs (CDDA / Red Book) only. SACDs, DVDs, Blu-rays, VideoCDs and copy-protected or damaged discs are not supported.
- Storage: Your system must have internal music storage. On STREAM series, ZEN Next-Gen series and NAZARÉ, this requires an installed M.2 NVMe SSD. Storage is built in as standard on ZEN MkII, ZEN Mk3, and STATEMENT series.
- External CD drive: STREAM series, ZEN Next-Gen series and NAZARÉ require a compatible USB optical drive, whilst the previous ZEN MkII, ZEN Mk3, and STATEMENT series already have an integrated drive for immediate CD ripping.
- Audio quality: CDs can be ripped to WAV or to FLAC (with 0 compression). Both are lossless formats and preserve the original CD audio.
- Metadata: Sense automatically retrieves album titles, artists, track listings, release years and artwork where available.
- Playback: CDs cannot be played directly. They must first be ripped to your music library.
Set up your CD drive
For STREAM series, ZEN Next-Gen series and NAZARÉ only. MkII, Mk3 and STATEMENT users can skip to Step 2.
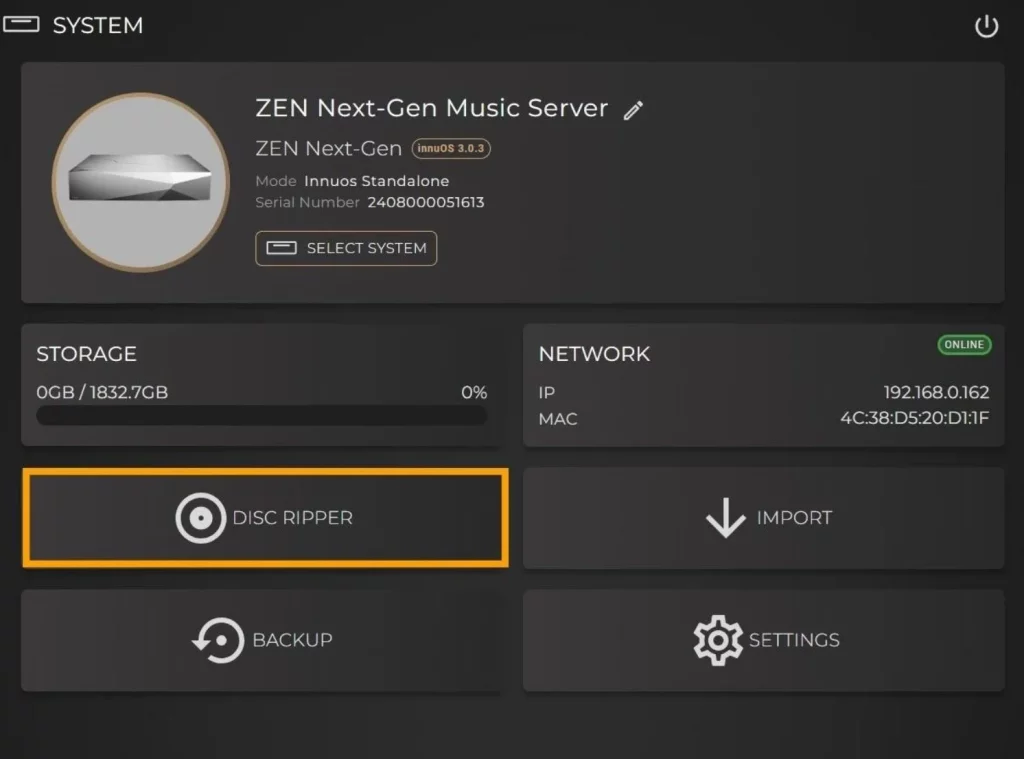
- Connect the USB optical drive to a spare USB port on your Innuos system.
- Open Sense and navigate to System → Disc Ripper.
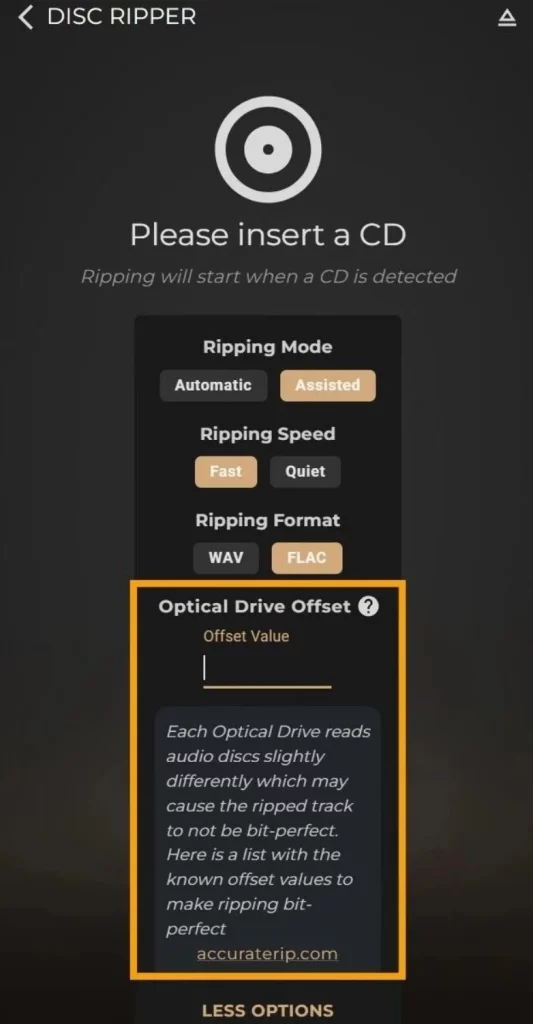
- Look up your optical drive’s model on AccurateRip to find its correction offset.
- Enter the offset value in the Disc Ripper settings. This helps ensure accurate, bit-perfect extraction of the CD audio.
Once configured, you can start ripping CDs. You can also adjust your preferred ripping mode, speed and file format.
Choose your ripping settings
Ripping Mode
- Automatic (Default): Starts ripping immediately when a CD is inserted. Best for most users.
- Assisted: Lets you review and edit the pre-fetched album information before ripping. Recommended when metadata needs to be approved before ripping.
Ripping Speed
- Fast (Default): Rips CDs as quickly as possible.
- Quiet: Reduces the noise of the optical drive by slowing the ripping process.
Fast and Quiet produce the same audio quality. Choose Quiet if you want less drive noise while listening.
Ripping Format
- FLAC: Lossless, with zero-level compression to minimize CPU load during decompression for playback. FLAC is more commonly supported across consumer media devices and more efficient with library storage space.
- WAV: Lossless, uncompressed audio, also supporting embedded metadata.
CD Ripping
Rip your CD collection to your Innuos music library and enjoy your music without needing to handle physical discs. Sense extracts the audio and stores it on your system, automatically retrieving album information and artwork where available.
Before you start: What you need to know
- Compatible CDs: Standard audio CDs (CDDA / Red Book) only. SACDs, DVDs, Blu-rays, VideoCDs and copy-protected or damaged discs are not supported.
- Storage: Your system must have internal music storage. On STREAM series, ZEN Next-Gen series and NAZARÉ, this requires an installed M.2 NVMe SSD. Storage is built in as standard on ZEN MkII, ZEN Mk3, and STATEMENT series.
- External CD drive: STREAM series, ZEN Next-Gen series and NAZARÉ require a compatible USB optical drive, whilst the previous ZEN MkII, ZEN Mk3, and STATEMENT series already have an integrated drive for immediate CD ripping.
- Audio quality: CDs can be ripped to WAV or to FLAC (with 0 compression). Both are lossless formats and preserve the original CD audio.
- Metadata: Sense automatically retrieves album titles, artists, track listings, release years and artwork where available.
- Playback: CDs cannot be played directly. They must first be ripped to your music library.
1. Set up your CD drive
For STREAM series, ZEN Next-Gen series and NAZARÉ only. MkII, Mk3 and STATEMENT users can skip to Step 2.
- Connect the USB optical drive to a spare USB port on your Innuos system.
- Open Sense and navigate to System → Disc Ripper.
- Look up your optical drive’s model on AccurateRip to find its correction offset.
- Enter the offset value in the Disc Ripper settings. This helps ensure accurate, bit-perfect extraction of the CD audio.
Once configured, you can start ripping CDs. You can also adjust your preferred ripping mode, speed and file format.
2. Choose your ripping settings
Ripping Mode
- Automatic (Default): Starts ripping immediately when a CD is inserted. Best for most users.
- Assisted: Lets you review and edit the pre-fetched album information before ripping. Recommended when metadata needs to be approved before ripping.
Ripping Speed
- Fast (Default): Rips CDs as quickly as possible.
- Quiet: Reduces the noise of the optical drive by slowing the ripping process.
Fast and Quiet produce the same audio quality. Choose Quiet if you want less drive noise while listening.
Ripping Format
- FLAC: Lossless, with zero-level compression to minimize CPU load during decompression for playback. FLAC is more commonly supported across consumer media devices and more efficient with library storage space.
- WAV: Lossless, uncompressed audio, also supporting embedded metadata.
3. Rip your CD
- Insert a compatible audio CD into the drive.
- If using Automatic mode, ripping begins automatically. In Assisted mode, review the album information and make any necessary metadata corrections before confirming.
- Allow the ripping process to finish, its progress can be viewed in real-time.
- Find the album easily under New Music, ready to play.
CD Ripping Tips
- Take a short break after every 5–10 CDs to allow the optical drive to cool down.
- View your history of ripped CDs under the DISC RIPPER menu – any albums requiring your attention can be found here, such as rips containing missing tracks due to disc damage.
- If needed, the ripping can be cancelled midway through the process. No content from the CD is kept.